
How to Make Blueberry Butter - Easily! With Step-by-step Directions, Photos, Ingredients, Recipe and Costs
This month's notes: July 2026: Stored US apples are still available. See your state's crop availability calendar for more specific dates of upcoming crops.
Valentine's Day - February 14 - See this website for Valentines Day history, facts and top picks for fast, easy, inexpensive gifts for the man, woman or children in your life!
Easter will be April 16, 2017 - if you want to take your children to a free Easter egg hunt - see our companion website to find a local Easter Egg hunt!
And we have home canning, preserving, drying and freezing directions. You can access recipes and other resources from the drop down menus at the top of the page or the site search. If you have any questions or suggestions, feel free to write me! Also make your own ice cream; see How to make ice cream and ice cream making equipment and manuals. Have fun, eat healthier and better tasting, and save money by picking your own locally grown fruit and vegetables, and then using our easy directions
 Subscribe
to our: Email
alerts; Follow us on Twitter
Add
this page to your favorites! -
Email this page to a friend, or to yourself
Subscribe
to our: Email
alerts; Follow us on Twitter
Add
this page to your favorites! -
Email this page to a friend, or to yourself
Yield: 7 to 9 pint jars
Click here for a PDF print version
Making and canning your own
The only trick is, you really do need a Pressure Canner. Every university food science department and the government will tell you that it just is not safe to use the water bath bath method; it takes the higher temperatures of the pressure canner to kill the botulism bacteria.
See this FAQ for details: Can I use a water-bath canner instead of a Pressure Canner for low acid foods (like green beans, corn, meats)?
BUT, with a Pressure Canner it's easy. And although a Pressure Canner
costs $100 to $200 (see this page for pressure canners models, makes and prices), they last a lifetime, and your children and grandchildren may be using
it. You can also find free information from the USDA in this PDF
file (it will take a while to load!) about
selecting and using canners here!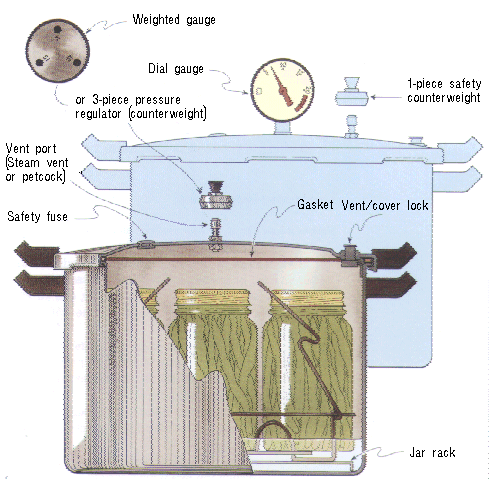 Pressure Canner works and its components" longdesc="Diagram of how a Pressure Canner works and its components" style="float: right">

So, here's how to can AAA. The directions are complete with instructions in easy steps and illustrated. In the winter when you open a jar, the AAA will taste MUCH better than any store-bought canned AAA.
Prepared this way, the jars have a shelf life of about 12 months, and aside from storing in a cool, dark place, require no special attention.
Ingredients
Equipment
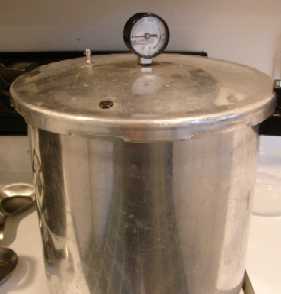
- 1 Pressure Canner (a large pressure pot with a lifting rack to sanitize the jars after filling (about $75 to $200 at mall kitchen stores and "big box" stores, but it is cheaper online; see this page for more information). For low acid foods (most vegetables, you can't use an open water bath canner, it has to be a Pressure Canner to get the high temperatures to kill the bacteria. If you plan on canning every year, they're worth the investment.
- Jar grabber (to pick up the hot jars)
- Jar funnel ($4 at mall kitchen stores and local "big box" stores, but it's usually cheaper online from our affiliates)
- At least 1 large pot
- Colander or sieve
- Large spoons and ladles,
- Canning jars (often called Ball jars, Mason jars or Kerr jars) (Publix, Kroger, other grocery stores and some "big box" stores carry them - now about $12 per dozen quart jars (up 50% in 2 years!) including the lids and rings)
Directions - Step by Step
Step -
Step 2 - Prepare the jars and pressure canner
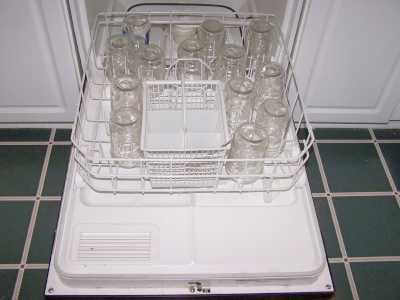
Wash the jars and lids
This is a good time to get the jars ready! The dishwasher is fine for the jars; especially if it has a "sanitize" cycle. Otherwise put the jars in boiling water for 10 minutes. I just put the lids in a small pot of almost boiling water for 5 minutes, and use the magnetic "lid lifter wand" (available from target, other big box stores, and often grocery stores; and available online - see this page) to pull them out.
Get a large pot of water boiling
We will use this water to pour over the beans and fill each jar with liquid, after we've packed them full of beans. I use the largest pot I have, so that there is plenty of clean, boiling water ready when I need it.

Get the pressure canner heating up
Rinse out your pressure canner, put the rack plate in the bottom, and fill it to a depth of 4 inches with hot tap water. (of course, follow the instruction that came with the canner, if they are different). Put it on the stove over low heat, with the lid OFF of it, just to get it heating up for later on.
Step -
Step -
Step -
Step -
Step -
Step - br>
Step - Put the lids and rings on
Put the lids on each jar and seal them by putting a ring on and screwing it down snugly (but not with all your might, just "snug").

Step - Put the jars in the canner and the lid on the canner (but still vented)
Using the jar tongs, put the jars on the rack in the canner. By now the water level has probably boiled down to 3 inches. If it is lower than that, add more hot tap water to the canner. When all the jars that the canner will hold are in, put on the lid and twist it into place, but leave the weight off (or valve open, if you have that type of pressure canner).
 Step - Let the canner vent steam for 10 minutes
Put the heat on high and let the steam escape through the vent for 10 minutes to purge the airspace inside the canner.
Step - Put the weight on and let the pressure build
After 10 minutes of venting, put the weight on and close any openings to allow the pressure to build to 11 pounds.
Step 12 - Process for 65 minutes for pint jars, 75 minutes for quarts
Once the gauge hits 10/11 pounds, as appropriate for your type of canner, start your timer going - for 25 minutes. Adjust the heat, as needed, to maintain 10 pounds of pressure.
Note: the chart below will help you determine the right processing time and pressure, if different types of canner, or are above sea level.
It is important to learn how to operate your pressure canner by reading the owner's manual that came with your particular canner. If you cannot find your owner's manual, you can obtain find one online: Here is where to find some common manufacturer's manuals:
or by contacting the company that made your canner. Give the model number
to the manufacturer, and they will send you the right manual. More
information about pressure canners and a variety of models you can order.
Insert tables here!

Step - Turn off the heat and let it cool down

After the required time and pressure, turn off the heat and let the canner cool down. After the pressure drops to zero (usually, you can tell but the "click" sound of the safety release vents opening, as well as but the gauge. Wait 3 more minutes, then open the vent or remove the weight and allow the steam to escape.
Step - Remove the jars
Lift the jars out of the water and let them cool on a wooden cutting board or a towel, without touching or bumping them in a draft-free place (usually takes overnight), here they won't be bumped. You can then remove the rings if you like, but if you leave them on, at least loosen them quite a bit, so they don't rust in place due to trapped moisture. Once the jars are cool, you can check that they are sealed verifying that the lid has been sucked down. Just press in the center, gently, with your finger. If it pops up and down (often making a popping sound), it is not sealed. If you put the jar in the refrigerator right away, you can still use it. Some people replace the lid and reprocess the jar, then that's a bit iffy. If you heat the contents back up, re-jar them (with a new lid) and the full time in the canner, it's usually ok. You're done!
This document was adapted from the "Complete Guide to Home Canning,"
Agriculture Information Bulletin No. 539, USDA, revised 2006.
Reviewed May 2009.
Tips
Comments and Feedback
Illustrated Canning, Freezing, Jam Instructions and Recipes
[ Easy Home Canning Directions] [FAQs - Answers to common questions and problems] [Recommended books about home canning, jam making, drying and preserving!] [Free canning publications to download and print]
