Looking for How to Make Pear Relish - Easily! With Step-by-step Photos, Recipe, Directions, Ingredients and Costs in 2026? Scroll down this page and follow the links. And if you bring home some fruit or vegetables and want to can, freeze, make jam, salsa or pickles, see this page for simple, reliable, illustrated canning, freezing or preserving directions. There are plenty of other related resources, click on the resources dropdown above. If you are having a hard time finding canning lids, I've used these, and they're a great price & ship in 2 days.
If you have questions or feedback, please let me know! There are affiliate links on this page. Read our disclosure policy to learn more.
How to Make Pear Relish - Easily! With Step-by-step Photos, Recipe, Directions, Ingredients and Costs
How to Make Homemade Pear Relish
PDF print version coming
Making and canning your own pear relish is quite easy. Here's how to do it, in 10 easy steps and completely illustrated.Also, see our easy illustrated directions about how to can pears, pear picking tips, make pear or applesauce, pear or apple butter and our list of apple festivals!
Ingredients
- 2 gallons of pears - see this page for descriptions of pear varieties
- 6 large onions
- 6 sweet green peppers
- 6 sweet red peppers
- 1 bunch celery (washed thoroughly) (celery is optional; the Ball recipe calls for it, not all do. It does give it a spicy flavor and texture)
- 3 cups of dry, granulated (table) sugar. Yes, you can substitute an equivalent amount of honey or agave; or even use Stevia (or Splenda) to taste. The sweetener does not affect the preserving safety qualities, although Stevia and Splenda result in a darker, runnier relish.
- 1 tablespoon allspice
- 1 tablespoon salt
- 5 cups vinegar (5%)
Equipment
- Jar grabber (to pick up the hot jars)
- Jar funnel ($4 at mall kitchen stores and local "big box" stores, but it's usually cheaper online from our affiliates)
- At least 1 large pot
- Jelly strainer (see step 6) or cheesecloth
- Large spoons and ladles,
- Canning jars (often called Ball jars, Mason jars or Kerr jars) (Publix, Kroger, other grocery stores and some "big box" stores carry them - now about $12 per dozen quart jars (up 50% in 2 years!) including the lids and rings
- 1 water bath canner (a huge pot with a lifting rack to sanitize the jars of pear jelly after filling (about $30 to $35 at mall kitchen stores and local "big box" stores, but it's usually cheaper online from our affiliates) You CAN use a large pot instead, but the canners are deeper, and have a rack top make lifting the jars out easier. If you plan on canning every year, they're worth the investment.
- Vegetable / fruit peeler ($1.99 at the grocery store)
Recipe and Directions
Yield: About 10 pint jars
Step 1 - Selecting the pears
The most important step! You need pears that are sweet if you want to cut down on the added sugar.
Step 2 - How many pears and where to get them
You can pick your own, or buy them at the grocery store. But for large quantities, you will find that real farmer's markets, like the State Farmer's Market in Forest Park, Georgia have them at the best prices. In 2007, they were available from late September at $12 to $20 per bushel.
You will get about 14 quarts of pear jelly per bushel of pears.
Step 3 -Wash and peel the pears!
I'm sure you can figure out how to wash the pears, onions, peppers and celery in cold water and remove any stickers or labels on them.
Using a vegetable peeler or a paring knife, peel the pears.
Step 4 -Chop the pears, peppers, onion and celery
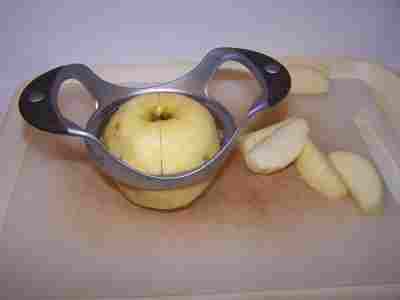 Chopping
the the pears is much faster if you use one of those pear corer/segmenters - you
just push it down on an pear and it cuts it into segments.
Chopping
the the pears is much faster if you use one of those pear corer/segmenters - you
just push it down on an pear and it cuts it into segments. 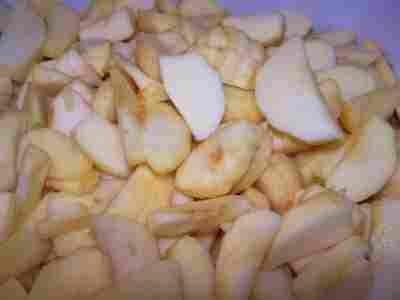
Using a paring knife, be sure to remove any seeds, hard parts (usually the part around the seeds) and any mush or dark areas.
Then either chop the pears and vegetables into 1/4 inch pieces by hand or put them through a food processor or chopper and pulse it a few times.
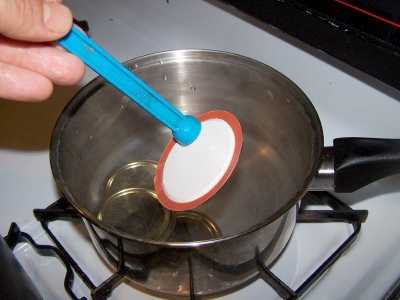
Step 5 - Measure out the sweetener
Depending upon which type of sweetener you prefer (sugar, no-sugar, Stevia (but you will have to experiment with amount, each brand of Stevia is a different concentration), or Splenda, or a mix of sugar and Stevia (or Splenda) or fruit juice) you will need to use a different amount of sugar .
| Type of relish | Sweetener |
| regular | 3 cups of sugar |
| lower sugar | 1.5 cups of sugar |
| lowest sugar | 3 cups Splenda (or about 1/3 that if you use Stevia, which is my preference) |
| lower sugar | 1 cups sugar and 2 cups Splenda or about 1 cup of Stevia) |
| no sugar | 3 cups Splenda or about 1 cup Stevia |
| natural | 3 cups fruit juice (grape, pear, apple or mixed) |
Step 6 - Mix remaining ingredients and cool overnight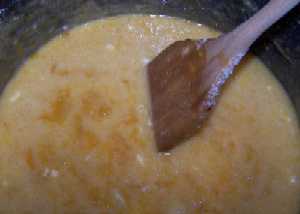
Stir in the sugar, allspice, salt and vinegar into the chopped mixture and let stand, covered, overnight in the refrigerator.
Step 7 - Heat the mixture
Pretty simple! Heat the relish mixture to boiling; and then simmer for 5 minutes.
Step 8 - Fill the jars and put the lid and rings on
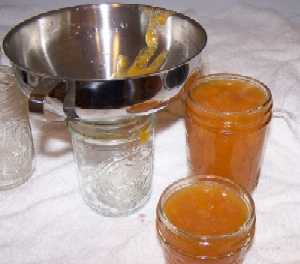 Fill
them to within 1/2-inch of the top, wipe any spilled relish off the top, seat
the lid and tighten the ring around them. Then put the filled jars into the canner!
Fill
them to within 1/2-inch of the top, wipe any spilled relish off the top, seat
the lid and tighten the ring around them. Then put the filled jars into the canner!
 This
is where the jar tongs and lid lifter come in really handy!
This
is where the jar tongs and lid lifter come in really handy!
Step 9 - Process the jars in the boiling water bath
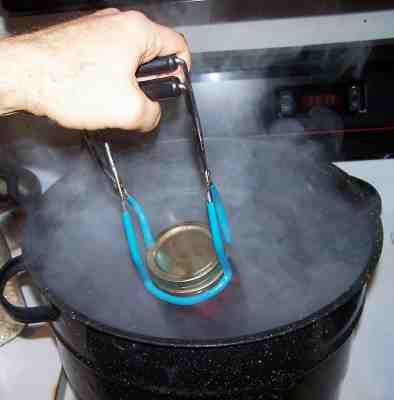 Keep
the jars covered with at least 2 inches of water. Keep the water boiling, If
the water stops boiling when you add the jars, start timing from when it
returns to a boil. Then boil for 20 minutes (at sea level up to 1,000 of
elevation, above that, see the table below)
Keep
the jars covered with at least 2 inches of water. Keep the water boiling, If
the water stops boiling when you add the jars, start timing from when it
returns to a boil. Then boil for 20 minutes (at sea level up to 1,000 of
elevation, above that, see the table below)
Note: Some people don't even boil the jars; they just ladle it hot into hot jars, put the lids and rings on and invert them, (this is called "open kettle" processing). Open kettle process is universally condemned by all of the authorities (USDA, FDA, Universities - Clemson, UGa, Minnesota, WI, Michigan, etc,.) as being inherently dangerous and conducive to botulism. It does not create a sterile environment; it does create the ideal environment for botulism to grow.
Putting the jars in the boiling water bath REALLY helps to reduce spoilage! To me, it makes little sense to put all the working into making the relish and then not to process the jars to be sure they don't spoil or risk your family's health.!
Pack hot relish into hot pint jars, leaving 1/2 inch headspace. Remove air bubbles and adjust headspace if needed. Wipe rims of jars with a dampened clean paper towel; adjust two-piece metal canning lids and ...
Process in a Boiling Water Canner using pint jars (or smaller jars)
| Recommended process time for Pear Relish in a boiling-water canner. | |||
| Process Time at Altitudes of | |||
| 0 - 1,000 ft | 1,001 - 3,000 ft | 3,001 - 6,000 ft | Above 6,000 ft |
| 20 min | 25 | 30 | 35 |
Step 10 - Remove and cool the jars - Done!
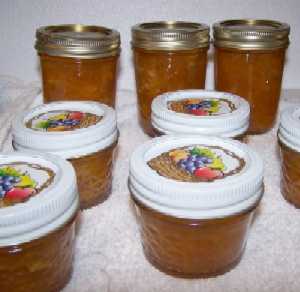 Lift
the jars out of the water and let them cool without touching or bumping
them in a draft-free place (usually takes overnight) You can then remove
the rings if you like, but if you leave them on, at least loosen them
quite a bit, so they don't rust in place due to trapped moisture. Once
the jars are cool, you can check that they are sealed verifying that the
lid has been sucked down. Just press in the center, gently, with your
finger. If it pops up and down (often making a popping sound), it is not
sealed. If you put the jar in the refrigerator right away, you can still
use it. Some people replace the lid and reprocess the jar, then that's a
bit iffy. If you heat the contents back up, re-jar them (with a new lid)
and the full time in the canner, it's usually ok.
Lift
the jars out of the water and let them cool without touching or bumping
them in a draft-free place (usually takes overnight) You can then remove
the rings if you like, but if you leave them on, at least loosen them
quite a bit, so they don't rust in place due to trapped moisture. Once
the jars are cool, you can check that they are sealed verifying that the
lid has been sucked down. Just press in the center, gently, with your
finger. If it pops up and down (often making a popping sound), it is not
sealed. If you put the jar in the refrigerator right away, you can still
use it. Some people replace the lid and reprocess the jar, then that's a
bit iffy. If you heat the contents back up, re-jar them (with a new lid)
and the full time in the canner, it's usually ok.
Once cooled, they're ready to store. I find they last up to 12 months. But after about 6 to 8 months, they get darker in color and start to get runny. They still are safe to eat, but the flavor and texture aren't as good. So eat them in the first 6 months after you prepare them!
This document was adapted from "So Easy to Preserve", 5th ed. 2006. Bulletin 989, Cooperative Extension Service, The University of Georgia, Athens. Revised by Elizabeth L. Andress. Ph.D. and Judy A. Harrison, Ph.D., Extension Foods Specialists.
Other Equipment:
From left to right:
- Jar lifting tongs
helpful to pick up hot jars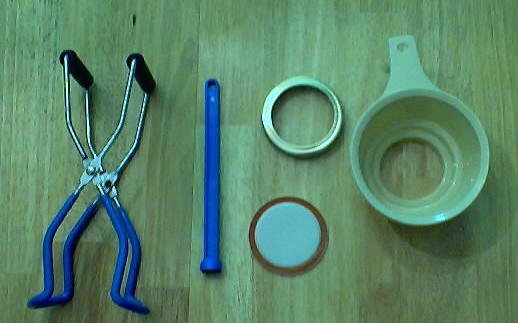
- Lid lifter
- to remove lids from the pot
of hot water - Lids
- disposable - you may only
use them once - Ring
- holds the lids on the jar until after
the jars cool - then you remove them, save them and reuse them - Canning Jar funnel
- to fill the jars
|
See here for related tools, equipment, supplies on Amazon
See here for related tools, equipment, supplies on Amazon
|
Home Canning KitsSee the seller's website for features, pricing and user reviews! This is the same type of standard canner that my grandmother used
to make everything from pear relish to jams and jellies to tomato and
spaghetti sauce. This complete kit includes everything you need: the
canner, jar rack, Jar grabber tongs, lid lifting wand, a plastic funnel,
labels, bubble freer, and the bible of canning, the Ball Blue Book. You will never need anything else except more jars and lids! |
| Find this item (B09WDKLMPW) on Amazon See here for related tools, equipment, supplies on Amazon |
Deluxe Food Strainer & Sauce MakerD220-DLXRetail:
$89.95Our
price: $69.00
With the Deluxe Food Strainer/Sauce Maker, you can make
creamy pear sauce and smooth tomato sauce without having
to peel and core! This multi-use strainer forces food
through a stainless steel screen, automatically
separating the juice and pulp from the seeds, shins, and
stems. Perfect for purees, creamed soups, baby foods,
pie filling, juices, jams, and more. Save time, effort,
and money by preparing your own tasty sauces to be used
immediately or boiled for future use. Do bushels with
ease and in a fraction of the time. Includes the
tomato/apple screen with easy twist on design and
instruction/recipe booklet.
The Deluxe model comes with the standard Tomato/Pear Screen; as well as the Berry Screen, Pumpkin Screen, and Grape Spiral. Note
|
See here for related tools, equipment, supplies on Amazon |
Mirro Stainless Steel Foley Food Mill
|


Looking for canning equipment and supplies?
Water bath canner with a jar rack
Pressure canners for gas, electric and induction stoves: Presto 23Qt or T-fal 22Qt
 Canning scoop (this one is PERFECT)
 Ball Blue book (most recent version)
Jars: 8oz canning jars for jams

Want to start your own Podcast, Blog, Vlog, etc? This
GoPro kit has EVERYTHING you need:
all accessories
Find Other types of farms:
Farm markets and roadside stands
Road trips and camping resources
Local Honey, apiaries, beekeepers
Consumer fraud and scams information
Home canning supplies at the best prices on the internet!
Maple Syrup Farms, sugarworks, maple syrup festivals
Environmental information and resources
Farms For Your Event for birthday parties, weddings, receptions, business meetings, retreats, etc.
Festivals - local fruit and vegetable festivals
Get the
most recent version of
the Ball Blue Book
Canning and preserving, making jams, salsa, sauces, pickles, etc is SO easy with our step by step directions! Just about all you need is a canner and canning jars!
