Apple juice - 3 cups of bottled, unsweetened apple
juice
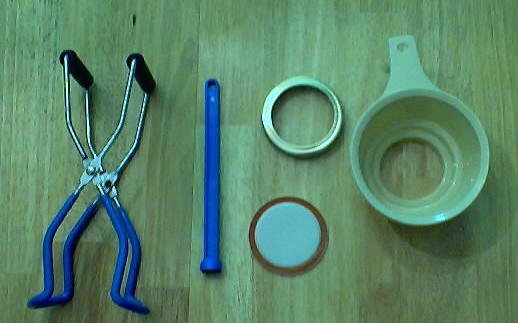
Equipment
Jar funnel ($5 at Target, other big box stores, and often grocery stores; and available online - see this page) or order it as part of the kit
with the Jar grabber .
At least 1 large pot; I prefer 16 to 20
quart Nonstick ceramic coated pots for easy cleanup.
Half pint canning jars (Grocery stores, like Publix, Kroger, Safeway carry them, as do some big box stores - now about $12 per dozen quart jars (up 50% in 2 years!) including the lids and rings)
Lids - thin, flat, round metal lids with
a gum binder that seals them against the top of the jar. They
may only be used once.
Jar grabber (to pick up the hot jars) - Big box stores and grocery stores sometimes carry them; and it is available online - see this page. It's a tremendously useful to put jars in the canner and
take the hot jars out (without scalding yourself!). The kit sold
below has everything you need, and at a pretty good price:
Rings - metal bands that secure the lids
to the jars. They may be reused many times.
Optional stuff:
Lid lifter (has a magnet to pick the lids out of the almost-boiling water where you sanitize them. ($4 at big box stores or it comes in the kit at left)
Onion Marmalade Directions
This example shows you how to make Onion
Marmalade. The yield from this recipe is about 5 eight-ounce jars.
Step 1 - Select the fruit
You
can go pick your own Onions! Otherwise,
you will have to go to the grocery store for the onions. The recipe
traditionally uses red onions, but I'm partial to Vidalia's.
Pick fresh onions that are not soft, moldy or discolored.
Step 2 - Peel the onions
With your hands rub the onions and remove any loose dry outer skins.
You can then either peel the onions with a knife and cutting board or by
immersing them in boiling water then cold water.
To peel onions by immersion, place a few at a time in a wire-mesh basket or
strainer, (or lacking those, simply dump them in) into a large pot of boiling water for 30 seconds, then remove and place in
cold (preferably icy) water for 30 seconds. Cut a 1/16th-inch slice from the root end,
and then remove the peel and 1/16th inch from the other end of the
onion. The tough outer layer should slide off easily now.
Step 3 - Slice the onions
Slice the onions 1/4 inch thick and then separate the slices into rings.
Step 4 - Get the
jars and lids washed
The dishwasher is fine for the jars; especially if it has a "sanitize" cycle; you don't really have to sanitize
the jars - the boiling water bath sanitizes everything, jar,
lid, contents and all; but you DO want
to get the jars as clean as you can first.
I get the dishwasher going while I'm preparing everything else, so the
jars are clean and hot (and less likely to crack when you put boiling
hot fruit in them) by the time I'm ready to fill the jars.
Lids: Put the lids into a pan of
hot water for at least several minutes; to soften up the gummed surface
and clean the lids.
Mix the dry pectin with about 1/4 cup
of sugar and Keep this separate from the rest of the sugar. If you are not using sugar, you will just have to stir more vigorously to prevent the pectin from clumping.
Note: you
can also add some spice at this point, if you like! Some people
add 1 teaspoon of cinnamon, ginger or cloves. Purists add none of
these!
Step 6 - Saute the onions
Saute the onions cranberries, brown sugar
and apple cider vinegar over medium heat until the onions are
transparent-looking.
Step 7 - Heat the mixture with the other ingredients (except the sugar)
Combine the onion mixture from the previous step with the 1.5 packets of
pectin, grated orange peel, and apple juice in a large pot. Bring it to a
boil over medium heat.
Notes about pectin: I usually add about
50% more pectin (just open another pack and
adhalf) or else the jam is runnier than I like. With a little practice,
you will find out exactly how much pectin to get the thickness you like.
Another tip: use the low sugar pectin. It cuts the amount of sugar
you need from 7 cups per batch to 4 cups! And it tastes even better!
On the other hand; I have never had success with the No-sugar pectin.
It always turned out runny and bland. You might want to try using the
low sugar recipe with a mixture of sugar and Stevia (in a prepared form like Truvia, it measures same as sugar; if you use another form, you will need do your own conversion) - or Splenda, if you prefer, ; that could work.
Is your jam too runny? Pectin enables you to turn out
perfectly set jam every time. Made from natural apples, there are also
low-sugar pectins that allow you to reduce the sugar you add by almost
half!
Get them all here at the best prices on the internet!
Step 8 - Add the sugar
Once you get a sustained rolling boil, stir in the sugar. Return to a
full rolling boil. You must then time it; boiling hard for 1 minute from
the time you get a full boil going again.
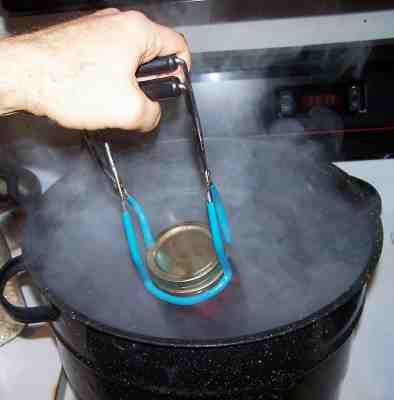
Step 9 - Fill the jars and put the lid and
rings on
Fill them to within 1/4-inch of the top, wipe any spilled jam off the
top, seat the lid and tighten the ring around them. Then put the filled jars into the canner!
This is where the jar tongs come in really
handy!
Step 10 - Process the jars in the boiling
water bath
Keep the jars covered with at least 2 inches of water. Keep the water
boiling. Boil them for at 15 minutes.
Note: Some people don't even boil the jars; they just ladle it hot into hot jars, put the lids and rings on and invert them, but putting the jars in the boiling water bath REALLY helps to reduce spoilage! To me, it makes little sense to put all the working into making the jam and then not to process the jars to be sure they don't spoil!
Step 11 - Done
Lift the jars out of the water and let them cool without touching or
bumping them in a draft-free place (usually takes overnight) You can then remove the rings if you like, but if you leave them on, at least loosen them quite a bit, so they don't rust in place due to trapped moisture. Once the jars are cool, you can check that they are sealed verifying that the lid has been sucked down. Just press in the center, gently, with your finger. If it pops up and down (often making a popping sound), it is not sealed. If you put the jar in the refrigerator right away, you can still use it. Some people replace the lid and reprocess the jar, then that's a bit iffy. If you heat the contents back up, re-jar them (with a new lid) and the full time in the canner, it's usually ok.
It may take up to two weeks for the marmalade to set and thicken up.
It will be runny until then!
Once cooled, they're ready to store.
I find they last about 18 month. The color darkens over time, but as long
as they stay sealed, that's normal and safe, and doesn't affect the flavor.
Summary - Cost of Making Homemade
Marmalade - makes 5 jars of 8 oz each*
Item
Quantity
Cost in 2026
Source
Subtotal
Onions
8
medium or large sized
$2.00
Grocery store
$2.00
Lemons
2
$1.00
Grocery Store
$1.00
Canning jars (8 oz size), includes lids and
rings
5 jars
$11/dozen 8 oz jars or $0.92/jar12.00
Grocery stores (Publix, Kroger, Safeway, etc.)
$3.25
Sugar
4 cups
$2.00
Grocery stores (Publix, Kroger, Safeway, etc.)
$2.00
Pectin (low sugar, dry)
1 and a half boxes
$2.00 per box
Grocery stores (Publix, Kroger, Safeway, etc.)
$4.00
Total
$13.20 total
or about $1.32 per jar
* - This assumes you already have the pots, pans, ladles,, and
reusable equipment. Note that you can reuse the jars! Many
products are sold in jars that will take the lids and rings for
canning. For example, Classico Spaghetti sauce is in quart sized
jars that work with Ball and Kerr lids and rings. Note that
the Classico's manufacturer does not recommend reuse of their jars:
see what they have to say on this
page:
Can't find the equipment? We
ship to all 50 states! Use our Feedback
form!
Why should cooked marmalade be made in small batches? If a larger quantity of juice is used, it will be necessary to boil it longer
thus causing loss of flavor, darkening of the maramalade, and toughening of the
finished product.
It really doesn't work. Trust me; I've tried many times!
What do I do if there's mold on my
marmalade? Discard jams and jellies with mold on them. The mold could be producing a
mycotoxin (poisonous substance that can make you sick). USDA and microbiologists
recommend against scooping out the mold and using the remaining jam or
marmalade.
Why did my
marmalade ferment, and what do I
do?
Jellied fruit products may ferment because of yeast growth. This can occur if
the product is improperly processed and sealed, or if the sugar content is low.
Fermented fruit products have a disagreeable taste. Discard them.
If you want to learn how NOT to make marmalade, read
this entertaining account from this Australian woman who is either incredibly
cheap or a slow learner... but either way, it's a funny story!
These are my favorite essential canning tools, books and supplies. I've been using many of these for over 50 years of canning! The ones below on this page
are just the sampling of. my preferred tools. but you can find much more detailed and extensive selections on the pages that are linked below.
The All New Ball Book Of Canning And Preserving: Over 350 of the Best Canned, Jammed, Pickled, and Preserved Recipes Paperback
This is THE book on canning! My grandmother used this book when I
was a child.; It tells you in simple instructions how to can almost
anything; complete with recipes for jam, jellies, pickles, sauces, canning
vegetables, meats, etc.
Of course, you do not need to buy ANY canning book as I have about 500 canning, freezing, dehydrating and more recipes all online for free, just see
Easy Home Canning Directions.
I have several canners, and my favorite is the stainless steel one at right. It is easy to clean and seems like it will last forever. Mine is 10 years
old and looks like new.
The black ones are the same type of standard canner that my grandmother used to make everything from applesauce to jams and jellies to tomato and spaghetti sauce.
This complete kit includes everything you need and lasts for years: the canner, jar rack, Jar grabber tongs, lid lifting wand, a plastic funnel, labels, bubble freer, It's much cheaper than buying the items separately.
It's only missing the bible of canning, the Ball Blue Book.
You will never need anything else except jars & lids (and the jars are reusable)!
The complete list of canners is on these pages:
Water bath canners
- Good for acidic foods, like applesauce, pickles, salsa, jams, jellies, most fruits
Pressure canners
- needed for low and non-acidic foods, like canned vegetables (corn, green beans, etc), and meats
If you plan on canning non-acidic foods and low acid foods that are not pickled - this means: meats, seafood, soups, green beans corn, most vegetables, etc., then you ABSOLUTELY must use a Pressure Canner.
Of course, you can use a pressure canner as a water bath canner as well - just don't seal it up, so it does not pressurize. This means a Pressure Canner is a 2-in-1 device. With it, you can can almost ANYTHING.
FREE Illustrated Canning, Freezing, Jam Instructions and Recipes
Don't spend money on books. that you don't need to. Almost everything you can find in some book sold online or in a store is on my website here for free. Start with theEasy Home Canning Directions below. That is a master list of canning directions which are all based upon the Ball Bblue book, the National Center for Home Food Preservation and other reputable lab tested recipes. Almost every recipe I present in addition to being lab tested com. is in a step by step format with photos for each step and complete. explanations. that tell you how to do it, where to get the supplies and pretty much everything you need to know. In addition, there almost always in a PDF format so you can print them out and use them while you cook.
Canning and preserving, making jams, salsa, sauces, pickles, etc is SO easy with our
step by step directions! Just about all you need is a canner
and canning jars!


 g. Boil them for at 15 minutes.


 Canning scoop (this one is PERFECT)
 Ball Blue book (most recent version)

