
Looking for How to make fermented pickles - made easy, and illustrated! With Step-by-step Photos, Recipe, Directions, Ingredients and Costs in 2026? Scroll down this page and follow the links. And if you bring home some fruit or vegetables and want to can, freeze, make jam, salsa or pickles, see this page for simple, reliable, illustrated canning, freezing or preserving directions. There are plenty of other related resources, click on the resources dropdown above. If you are having a hard time finding canning lids, I've used these, and they're a great price & ship in 2 days.
If you have questions or feedback, please let me know! There are affiliate links on this page. Read our disclosure policy to learn more.
How to make fermented pickles - made easy, and illustrated! With Step-by-step Photos, Recipe, Directions, Ingredients and Costs
Making Homemade Pickles
Using the fermentation method
Click here for a PDF print version
Making and canning your own pickles, gherkins, kosher dills, bread and butter, sweet pickles, etc. is one of the easiest things you can do with produce! Here's how to do it, in easy steps and completely illustrated. It is much faster than the old method your grandmother used with tons of pickling salt and de-scumming the brine! Ugh! This method is so easy, ANYONE can do this! It's a great thing to do with your kids! I'm experimenting with the various techniques, such as soaking the cucumbers overnight in lime solution first, using "pickle crisp" etc. I'' revise this page as I taste the results in the weeks to come!
Types of Pickles
- Fermented pickles are vegetables soaked in a brine solution for 4 to 6 weeks. During this time, lactic acid bacteria, naturally present on the surface of vegetables, grows. Other microbes are inhibited by salt. The color of the vegetables changes from bright green to olive/yellow-green, and the white interior becomes translucent. Examples include dill pickles and sauerkraut.
Other types are:
- Fresh-pack (or quick process) pickles are cured for several hours in a vinegar solution or are immediately combined with hot vinegar, spices, and seasonings. Examples include dills, bread-and-butter pickles and pickled beets. Quick Process is what these instructions (below on this page) show.
- Refrigerated dills are cucumbers marinated for 1 day to 1 week in a salt and spice brine (in the fridge) and then stored in the refrigerator for up to 2 months. No canning is required! See this page for refrigerated dill pickle directions!
- Fruit pickles are whole or sliced fruit simmered in a spicy, sweet-sour syrup. Examples include spiced peaches and crabapples. See this page for directions to make spiced peaches!
- Relishes are made from chopped fruits or vegetables that are cooked to a desired consistency in a spicy vinegar solution. Examples include corn relish and horseradish. See this page for cucumber pickle relish directions!
Ingredients
Use the following quantities for each gallon capacity of your container. (up to the amount you want to make, of course. You don't need to fill the container to capacity)
- 4 lbs of 4-inch pickling cucumbers: fresh, crisp - not wilted, soft or overripe!
- 2 tbsp dill seed or 4 to 5 heads fresh or dry dill weed
- 1/2 cup salt
- 1/4 cup vinegar (5 percent). It should be a clear vinegar (5%, apple cider vinegar works well. Store brand is about $1.25 for a 64 oz bottle.
- 8 cups water and one or more of the following ingredients:
- 2 cloves garlic (optional)
- 2 dried red peppers (optional)
- 2 tsp whole mixed pickling spices (optional)
Equipment
- 1 Water Bath Canner (a huge pot to sanitize the jars after filling (about $30 to $35 at mall kitchen stores, sometimes at big box stores and grocery stores.). Note: we sell many sizes and types of canners for all types of stoves and needs - see canning supplies
- Pint canning jars (Ball or Kerr jars can be found at grocery stores, like Safeway, Publix, Kroger, grocery stores, even online - about $13 per dozen 8-ounce jars, more for quilted design or larger jars, including the lids and rings). Be sure to get wide mouth jars to fit the pickles in! Pint size works best!
- Lids - thin, flat, round metal lids with a gum binder that seals them against the top of the jar. They may only be used once.
- Rings - metal bands that secure the lids to the jars. They may be reused many times.
- See this page for pickling supplies, equipment, books, crocks and additives.
- Jar grabber (to pick up the hot jars)
- Lid lifter (I like the lid rack that holds 12 lids or you can pull them out one at a time with the lid-lifter that has a magnet from the almost-boiling water where you sanitize them. ($4 at Target, other big box stores, and often grocery stores; and available online - see this page)
- Jar funnel ($5 at Target, other big box stores, and often grocery stores; and available online - see this page)
- 1 large pots; Nonstick ceramic coated pots for easy cleanup.
- Large spoons and ladles,
Pickling Equipment Notes:
The basic equipment used for pickling is similar to other types of canning. However, there are some differences:
- Utensils made of zinc, iron, brass, copper, or galvanized metal should not be used. The metal may react with acids or salts and cause undesirable color and taste changes in the pickles or make pickles unfit to eat. Likewise, enamelware with cracks or chips should not be used.
- For fermenting and brining, a crock or stone jar, an unchipped enamel-lined pan, a glass jar, a bowl, or a casserole can be used for small quantities. Kegs and barrels (made of hardwood and either enamel, glass, or paraffin lined) can be used for larger quantities. The container used must be fitted with a flat dish to fit inside and cover the food in the brine. A weight is necessary to hold the dish down and to keep the foods below the surface of the brine. A glass jar filled with water and closed with a cap makes a good weight.
Directions - How to Make Fermented Dill Pickles
Procedure: Wash cucumbers. Cut 1/16-inch slice off blossom end and discard. Leave 1/4-inch of stem attached. Place half of dill and spices on bottom of a clean, suitable container. For more information on containers see "Suitable Containers, Covers, and Weights for Fermenting Food," . Add cucumbers, remaining dill, and spices. Dissolve salt in vinegar and water and pour over cucumbers. Add suitable cover and weight. Store where temperature is between 70ºF and 75ºF for about 3 to 4 weeks while fermenting. Temperatures of 55º to 65ºF are acceptable, but the fermentation will take 5 to 6 weeks. Avoid temperatures above 80ºF, or pickles will become too soft during fermentation. Fermenting pickles cure slowly. Check the container several times a week and promptly remove surface scum or mold. Caution: If the pickles become soft, slimy, or develop a disagreeable odor, discard them. Fully fermented pickles may be stored in the original container for about 4 to 6 months, provided they are refrigerated and surface scum and molds are removed regularly. Canning fully fermented pickles is a better way to store them. To can them, pour the brine into a pan, heat slowly to a boil, and simmer 5 minutes. Filter brine through paper coffee filters to reduce cloudiness, if desired. Fill jar with pickles and hot brine, leaving 1/2-inch headspace. Adjust lids and process as recommended in the table below, or use the low-temperature pasteurization treatment described below.
The following treatment results in a better product texture but must be carefully managed to avoid possible spoilage. Place jars in a canner filled half way with warm (120º to 140ºF) water. Then, add hot water to a level 1 inch above jars. Heat the water enough to maintain 180º to 185º F water temperature for 30 minutes. Check with a candy or jelly thermometer to be certain that the water temperature is at least 180ºF during the entire 30 minutes. Temperatures higher than 185ºF may cause unnecessary softening of pickles.
|
Recommended process time for Dill Pickles in a boiling-water canner. |
||||
| Process Time at Altitudes of | ||||
| Style of Pack | Jar Size | 0 - 1,000 ft | 1,001 - 6,000 ft | Above 6,000 ft |
| Raw | Pints | 10 min | 15 | 20 |
| Quarts | 15 | 20 | 25 | |
This document was adapted from the "Complete Guide to Home Canning,"
Agriculture Information Bulletin No. 539, USDA, revised 1994.
Low-Temperature Pasteurization Treatment
The following treatment results in a better product texture but must be carefully managed to avoid possible spoilage. Place jars in a canner filled half way with warm (120º to 140º F) water. Then, add hot water to a level 1 inch above jars. Heat the water enough to maintain 180º to 185º F water temperature for 30 minutes. Check with a candy or jelly thermometer to be certain that the water temperature is at least 180ºF during the entire 30 minutes. Temperatures higher than 185ºF may cause unnecessary softening of pickles. Caution: Use only when recipe indicates.

Suitable Containers, Covers and Weights for Fermenting Food
A 1-gallon container is needed for each 5 pounds of fresh vegetables. Therefore, a 5-gallon stone crock is of ideal size for fermenting about 25 pounds of fresh cabbage or cucumbers. Food-grade plastic and glass containers are excellent substitutes for stone crocks. Other 1- to 3-gallon non-food-grade plastic containers may be used if lined inside with a clean food-grade plastic bag. Caution: Be certain that foods contact only food-grade plastics. Do not use garbage bags or trash liners. Fermenting sauerkraut in quart and half-gallon Mason jars is an acceptable practice, but may result in more spoilage losses.
Cabbage and cucumbers must be kept 1 to 2 inches under brine while fermenting. After adding prepared vegetables and brine, insert a suitably sized dinner plate or glass pie plate inside the fermentation container. The plate must be slightly smaller than the container opening, yet large enough to cover most of the shredded cabbage or cucumbers. To keep the plate under the brine, weight it down with 2 to 3 sealed quart jars filled with water. Covering the container opening with a clean, heavy bath towel helps to prevent contamination from insects and molds while the vegetables are fermenting. Fine quality fermented vegetables are also obtained when the plate is weighted down with a very large clean, plastic bag filled with 3 quarts of water containing 4-1/2 tablespoons of salt. Be sure to seal the plastic bag. Freezer bags sold for packaging turkeys are suitable for use with 5-gallon containers.
The fermentation container, plate, and jars must be washed in hot sudsy water, and rinsed well with very hot water before use.
General Information
The many varieties of pickled and fermented foods are classified by ingredients and method of preparation.
Regular dill pickles and sauerkraut are fermented and cured for about 3 weeks. Refrigerator dills are fermented for about 1 week. During curing, colors and flavors change and acidity increases. Fresh-pack or quick-process pickles are not fermented; some are brined several hours or overnight, then drained and covered with vinegar and seasonings. Fruit pickles usually are prepared by heating fruit in a seasoned syrup acidified with either lemon juice or vinegar. Relishes are made from chopped fruits and vegetables that are cooked with seasonings and vinegar.
Be sure to remove and discard a 1/16-inch slice from the blossom end of fresh cucumbers. Blossoms may contain an enzyme which causes excessive softening of pickles.
Caution: The level of acidity in a pickled product is as important to its safety as it is to taste and texture.
- Do not alter vinegar, food, or water proportions in a recipe or use a vinegar with unknown acidity.
- Use only recipes with tested proportions of ingredients.
- There must be a minimum, uniform level of acid throughout the mixed product to prevent the growth of botulinum bacteria.
Ingredients
Select fresh, firm fruits or vegetables free of spoilage. Measure or weigh amounts carefully, because the proportion of fresh food to other ingredients will affect flavor and, in many instances, safety.
Use canning or pickling salt. Noncaking material added to other salts may make the brine cloudy. Since flake salt varies in density, it is not recommended for making pickled and fermented foods. White granulated and brown sugars are most often used. Corn syrup and honey, unless called for in reliable recipes, may produce undesirable flavors. White distilled and cider vinegars of 5 percent acidity (50 grain) are recommended. White vinegar is usually preferred when light color is desirable, as is the case with fruits and cauliflower.
Pickles with reduced salt content
Recipes for pickles with reduced sodium content are provided in Guide 6 of the USDA Complete Guide to Home Canning.
In the making of fresh-pack pickles, cucumbers are acidified quickly with vinegar. Use only tested recipes formulated to produce the proper acidity. While these pickles may be prepared safely with reduced or no salt, their quality may be noticeably lower. Both texture and flavor may be slightly, but noticeably, different than expected. You may wish to make small quantities first to determine if you like them.
However, the salt used in making fermented sauerkraut and brined pickles not only provides characteristic flavor but also is vital to safety and texture. In fermented foods, salt favors the growth of desirable bacteria while inhibiting the growth of others. Caution: Do not attempt to make sauerkraut or fermented pickles by cutting back on the salt required.
Firming agents
Alum may be safely used to firm fermented pickles. However, it is unnecessary and is not included in the recipes in this publication. Alum does not improve the firmness of quick-process pickles. The calcium in lime definitely improves pickle firmness. Food-grade lime may be used as a lime-water solution for soaking fresh cucumbers 12 to 24 hours before pickling them. Excess lime absorbed by the cucumbers must be removed to make safe pickles. To remove excess lime, drain the lime-water solution, rinse, and then resoak the cucumbers in fresh water for 1 hour. Repeat the rinsing and soaking steps two more times. To further improve pickle firmness, you may process cucumber pickles for 30 minutes in water at 180°F. This process also prevents spoilage, but the water temperature should not fall below 180°F. Use a candy or jelly thermometer to verify the water temperature.
Preventing spoilage
Pickle products are subject to spoilage from microorganisms, particularly yeasts and molds, as well as enzymes that may affect flavor, color, and texture. Processing the pickles in a boiling-water canner will prevent both of these problems. Standard canning jars and self-sealing lids are recommended. Processing times and procedures will vary according to food acidity and the size of food pieces.
Step 1 - Selecting the cucumbers
 It's
fun to go pick your own and you can obviously get better quality
cucumbers!
It's
fun to go pick your own and you can obviously get better quality
cucumbers!
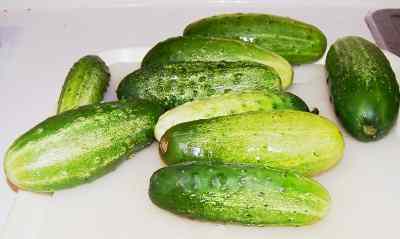
At right is a of picture cucumbers from my garden - they are SO easy to grow. But be sure to grow the varieties that are labeled "pickling cucumbers" - they will be much more crisp!
 The
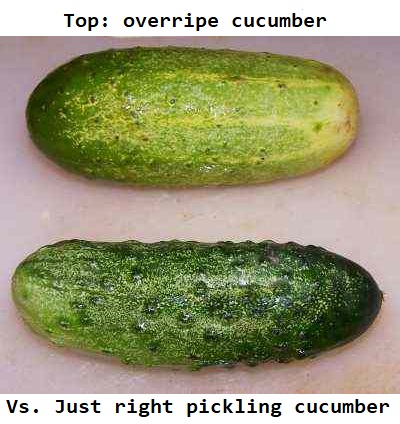
picture at right shows a good cucumber for pickling (bottom) and a bad one
(top). The good one is dark green, firm, and not bloated. It has
lots of warts!
The
picture at right shows a good cucumber for pickling (bottom) and a bad one
(top). The good one is dark green, firm, and not bloated. It has
lots of warts!
The bad one is overripe, it has yellow or white areas in the skin, and the warts are almost all gone. If you cut it open, you will see developed seeds. You don't want seeds!
Overripe cucumbers make mushy pickles.
Step 2 - How many cucumbers?
It takes about 3 or 4 cucumbers to fill a pint jar. Each cucumber is about 4 - 5 inches long and you will cut off the ends so they will fit with 1/4-inch to spare..
Step 3 -Wash and cut the vegetables!
 I'm
sure you can figure out how to wash the fruit in plain cold water.
I'm
sure you can figure out how to wash the fruit in plain cold water.
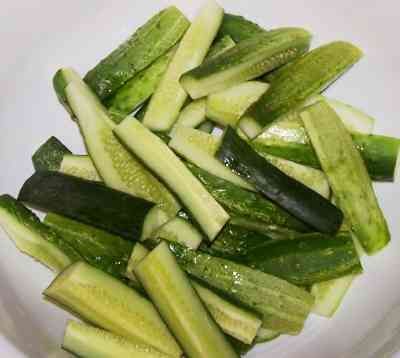
You will need to cut the ends off (about 1/4-inch, the blossom harbors microbes that can cause softening. ) and then slice them lengthwise if you like spears. You can also leave them whole or cut them cross-wise for bread-and-butter pickles.
Set them aside for use in step 7.
Step 4 - Get the jars and lids sanitizing
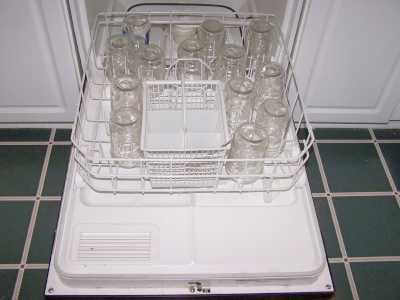
The dishwasher is fine for the jars; especially if it has a "sanitize"
cycle. I get that going while I'm preparing everything else, so it's
done by the time I'm ready to fill the jars. If you don't have a
dishwasher, submerge the jars in a large pot (the canner itself) of water
and bring it to a boil.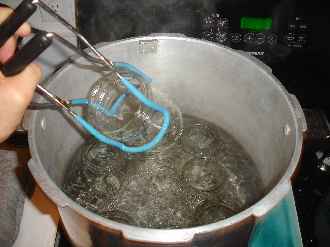
Be sure to let it go through the rinse cycle to get rid of any soap!
Get the canner heating up
Fill the canner about 1/2 full of water and start it heating (with the lid on).
Start the water for the lids
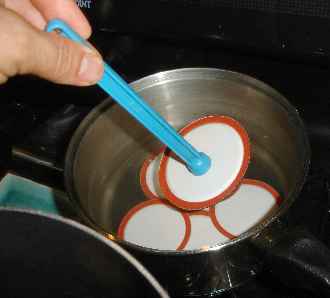 Put
the lids into a pan of hot, but not quite boiling water for at least several minutes.
Note: everything gets sanitized in the water bath (step 7) anyway, so this just
helps to ensure there is no spoilage later!)
Put
the lids into a pan of hot, but not quite boiling water for at least several minutes.
Note: everything gets sanitized in the water bath (step 7) anyway, so this just
helps to ensure there is no spoilage later!)
 Need
lids, rings and replacement jars?
Need
lids, rings and replacement jars?
Get them all here, delivered direct to your home, at the best prices on the internet!
Step 5 - Mix the vinegar with the pickling mix and bring to a near boil
 OK,
you can make your own pickling mix from spices, salt, dill, etc.; but it
is MUCH more time-consuming, complicated, and prone to problems.
This method produces pickles which are just as crisp - as long as you pick
very firm cucumbers.
OK,
you can make your own pickling mix from spices, salt, dill, etc.; but it
is MUCH more time-consuming, complicated, and prone to problems.
This method produces pickles which are just as crisp - as long as you pick
very firm cucumbers.
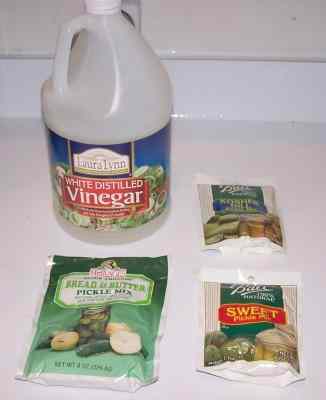
The stores (grocery stores, like Publix, Kroger and Safeway and local "big box" stores, sometimes even local hardware stores) sell several varieties of mixes - Kosher dill, bread-and-=butter and sweet pickles are the most commonly seen. And be sure to get them by July - they tend not to re-order them when they sell out. Mrs. Wages "quick process refrigerator pickle mixes" are the easiest, as they do not even require a water bath canner (but must be stored in the fridge!). The others require canning as shown in these instructions, and may be stored on the shelf.
Pickle Mixes
 To
interject a crass commercial here - hey, I've got to pay for
the website somehow :) I have found the best (crispest, best tasting)
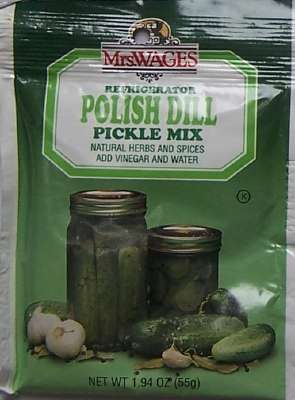
pickles from a mix are with the "Mrs. Wages Polish Dill Refrigerator Pickle
Mix" They REALLY are good AND you don't need a canner - you store them in
your fridge right after making them. They're ready to eat in 24 hours!
Our affiliate sells the mixes (and at really good prices, too)
To
interject a crass commercial here - hey, I've got to pay for
the website somehow :) I have found the best (crispest, best tasting)
pickles from a mix are with the "Mrs. Wages Polish Dill Refrigerator Pickle
Mix" They REALLY are good AND you don't need a canner - you store them in
your fridge right after making them. They're ready to eat in 24 hours!
Our affiliate sells the mixes (and at really good prices, too)
Whether you want dills or sweet pickles; canning them or straight into the refrigerator; there is a mix for every taste and need here!Get them all here, delivered direct to your home, at the best prices on the internet! Get everything you need to make pickles: mixes, salt, brine, etc. here!
Step 6 - Heat the pickle mix
 Bring
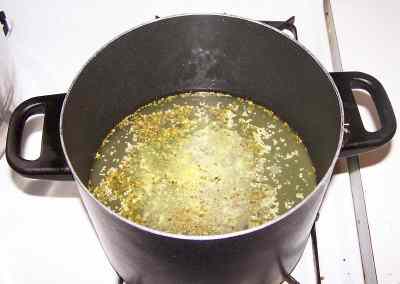
the mix and vinegar to a near-boil - just simmering!
Bring
the mix and vinegar to a near-boil - just simmering!
Be sure to use a NON-metal pot - or a coated metal (teflon, silverstone, enamel, etc.) without breaks in the coating. the metal reacts with the vinegar and makes the pickle solution turn cloudy.
Step 7 - Fill the jars with cucumbers and put the lid and rings on
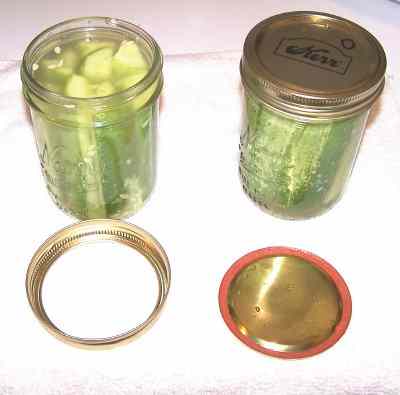 Pack
the raw cucumbers from step 3, whole or slices in and pour the simmering
pickle mix liquid over them. Fill them to within 1/4-inch of the top, seat
the lid and hand-tighten the ring around them.
Pack
the raw cucumbers from step 3, whole or slices in and pour the simmering
pickle mix liquid over them. Fill them to within 1/4-inch of the top, seat
the lid and hand-tighten the ring around them.
Step 8 - Boil the jars in the canner
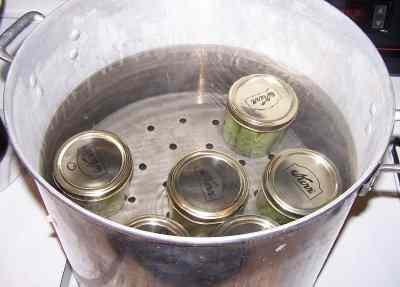 Put
them in the canner and keep them covered with at least 1 inch of water.
Keep the water boiling. Boil them for 10 minutes (or as directed by the
instructions in the pickle mix, or with your canner).
Remember to adjust for altitudes and
larger jars! Note: some mixes, such as the Ball Kosher Dill mix call
for only boiling for 5 minutes - I'll let you know how that works out!
generally, the longer you process the jars, the more mushy (less crisp)
the pickles will be.
Put
them in the canner and keep them covered with at least 1 inch of water.
Keep the water boiling. Boil them for 10 minutes (or as directed by the
instructions in the pickle mix, or with your canner).
Remember to adjust for altitudes and
larger jars! Note: some mixes, such as the Ball Kosher Dill mix call
for only boiling for 5 minutes - I'll let you know how that works out!
generally, the longer you process the jars, the more mushy (less crisp)
the pickles will be.
Step 9 - Done
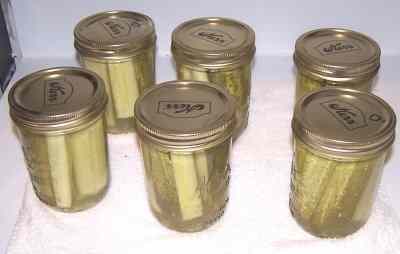 Lift
the jars out of the water and let them cool without touching or bumping
them in a draft-free place (usually takes overnight) You can then
remove the rings if you like, but if you leave them on, at least loosen
them quite a bit, so they don't rust in place due to trapped moisture.
Once the jars are cool, you can check that they are sealed verifying
that the lid has been sucked down. Just press in the center, gently,
with your finger. If it pops up and down (often making a popping sound),
it is not sealed. If you put the jar in the refrigerator right away, you
can still use it. Some people replace the lid and reprocess the jar,
then that's a bit iffy. If you heat the contents back up, re-jar them
(with a new lid) and the full time in the canner, it's usually ok.
Lift
the jars out of the water and let them cool without touching or bumping
them in a draft-free place (usually takes overnight) You can then
remove the rings if you like, but if you leave them on, at least loosen
them quite a bit, so they don't rust in place due to trapped moisture.
Once the jars are cool, you can check that they are sealed verifying
that the lid has been sucked down. Just press in the center, gently,
with your finger. If it pops up and down (often making a popping sound),
it is not sealed. If you put the jar in the refrigerator right away, you
can still use it. Some people replace the lid and reprocess the jar,
then that's a bit iffy. If you heat the contents back up, re-jar them
(with a new lid) and the full time in the canner, it's usually ok.
When can you start eating the pickles? Well, it takes some time for the seasonings to be absorbed into the pickles. That's at least 24 hours, but for best flavor wait 2 weeks! Ah... the wait...
Pickle Making Problems?
Some questions are answered at the bottom of this page. See this page for a more complete set of frequently asked pickling questions and answers
Summary - Cost of Making Homemade Pickles - makes 12 pint jars, 16 oz each* |
||||
| Item | Quantity | Cost in 2026 | Source | Subtotal |
| Cucumbers | 30-36 (about 3 per pint jar) | free from the garden, or $3.00 cents at a PYO | Pick your own | $3.00 |
| Canning jars (pint size, wide mouth), includes lids and rings | 12 jars | $8.00/dozen | Grocery stores (Publix, Kroger, Safeway, etc.) | $8.00 |
| Vinegar | 4 cups | $0.99 | Safeway, Publix, Kroger, grocery stores |
$0.99 |
| Pickle mix | 1 packet | $3.00 per package | Grocery stores (Publix, Kroger, Safeway, etc.) | $3.00 |
| Total | $15.00 total or about $1.25 per jar INCLUDING the jars - which you can reuse! |
|||
|
* - This assumes you already have the pots, pans, ladles,, and reusable equipment. Note that you can reuse the jars! Many products are sold in jars that will take the lids and rings for canning. For example, Classico Spaghetti sauce is in quart sized jars that work with Ball and Kerr lids and rings. Note that the Classico's manufacturer does not recommend reuse of their jars: see what they have to say on this page: |
||||
How to make other pickles - recipes and instructions:
- Refrigerator pickles (no canning required)
- Cucumber pickle relish
- Pickled beets
- Pickled green beans
- Pickled dilled okra
Canning processing times
|
Type of pickling method |
Jar size | 0 to 1,000 ft above sea level | 1,001 to 6,000 ft above sea level |
| Quick process, (raw cucumbers put in the jar, hot liquid poured over them)- | pint | 10 min | 15 min |
| Quick process, (raw cucumbers put in the jar, hot liquid poured over them)- | quart | 10 min | 15 min |
Can't find the equipment? We ship to all 50 states! Use our Feedback form!
Answers to Common Questions
What did I do wrong if my pickles aren't crisp or crunchy?
You probably used overripe cucumbers or didn't measure the vinegar and water accurately. Of course, processing too long in the boiling water bath can do it, too! Adding a small fresh grape leaf to each jar helps too (there's something in them that helps - see a question below) and finally, Ball's and others making a commercial product called "Pickle crisp" that helps. Overall, you will get the crispest pickles from using young, small cukes and then using a refrigerator method (See this page for refrigerated dill pickle directions) - you've probably notices the premium pickles at the grocery store must be refrigerated, too!
Why are my pickles cloudy?
There are a variety of possible causes for cloudy pickles:
In nonfermented pickles (fresh pack), cloudiness might indicate spoilage. Yeast growth may also make pickles cloudy or slimy. Check the pickles for signs of off-odors and mushiness of the pickles. If yeast growth is evident, discard the pickles. If these signs are absent, the pickles are (absent other problems) safe to eat.
Be sure to use a NON-metal pot - or a coated metal (teflon, silverstone, enamel, etc.) without breaks in the coating. the metal reacts with the vinegar and makes the pickle solution turn cloudy. This is the most common cause of cloudy pickles. There is no danger to these pickles, though!
Sometimes the fillers (anticaking agents) in regular table salt may cause slight cloudiness, so always use pickling salt. Obviously, if you used a packet mix (like Mrs. Wages) this should not be a problem.
Hard water might also cause cloudiness. If soft water is not available, boil the hard water and let it sit undisturbed overnight. Pour off the top portion and use it in the pickling solution.
When making quick process pickles, can I store any leftover pickling solution for future use?
If the pickling solution is fresh and has not been used to make pickles, cover it and store it in the refrigerator for later use. If the pickling solution has been used, it can be stored in the refrigerator and reused in a day or two for barbecue sauce, cole slaw dressing or a marinade. If mold growth occurs, throw it out.
Why did the liquid in my dill pickles turn pink?
Using overmature dill may cause this. If so, the product is still safe. However, yeast growth could also cause this. If yeast growth is evident, discard the pickles.
I don't have the type of dill my recipe calls for. What can I substitute?
For each quart, try 3 heads of fresh dill or 1 to 2 tablespoons dill seed (dill weed = 2 tablespoons).
Can I use burpless cucumbers for pickling?
Burpless cucumbers are not recommended for use in fermented pickles. This is because at their normal mature size, they produce an enzyme that causes the pickles to soften during fermentation. However, if smaller burpless cucumbers (those with small seed) are used, they may be suitable for making fresh pack pickles.
I have an old recipe that calls for adding a grape leaf to each jar of pickles. Why?
Grape leaves contain a substance that inhibits enzymes that make pickles soft. However, if you remove the blossom end of the cucumbers (the source of undesirable enzymes) you don't need to add grape leaves.
Why did the garlic cloves in my pickles turn green or bluish green?
This reaction may be due to iron, tin or aluminum in your cooking pot, water or water pipes reacting with the pigments in the garlic. Or, the garlic may naturally have more bluish pigment, and it is more evident after pickling. Immature bulbs should be cured two to four weeks at 70 ° F. The pickles are safe to eat.
Can I use flaked salt for pickling?
Most recipes call for granulated pickling or canning salt. Flake salt varies in density and is not recommended for pickling.
Canning Books, Supplies and Accessories
These are my favorite essential canning tools, books and supplies. I've been using many of these for over 50 years of canning! The ones below on this page are just the sampling of. my preferred tools. but you can find much more detailed and extensive selections on the pages that are linked below.
- Vacuum Foodsealers for freezing, dried foods, and refrigerated foods - the FoodSaver line
- Selecting a KitchenAid mixer and attachments for home canning
- Steam Juicers
- Strainers, pit removers, seed-skin-stem removers, jelly strainers, etc. All types, makes and prices (from $19 to $350)
- Cherry pitters reviews, prices and ordering
- Food dehydrators - easy and fast to dry your own fruits, veggies, sun-dried tomatoes, etc.
The All New Ball Book Of Canning And Preserving: Over 350 of the Best Canned, Jammed, Pickled, and Preserved Recipes Paperback
This is THE book on canning! My grandmother used this book when I was a child.; It tells you in simple instructions how to can almost anything; complete with recipes for jam, jellies, pickles, sauces, canning vegetables, meats, etc.
If it can be canned, this book likely tells you how! Click on the link below for more information and / or to buy (no obligation to buy)The New Ball Blue Book of Canning and Preserving
Canning and Preserving for Dummies by Karen Ward
This is another popular canning book. Click here for more information, reviews, prices for Canning and Preserving For Dummies
Of course, you do not need to buy ANY canning book as I have about 500 canning, freezing, dehydrating and more recipes all online for free, just see Easy Home Canning Directions.
Home Canning Kits
Ball Enamel Water Bath Canners:

I have several canners, and my favorite is the stainless steel one at right. It is easy to clean and seems like it will last forever. Mine is 10 years old and looks like new.
The black ones are the same type of standard canner that my grandmother used to make everything from applesauce to jams and jellies to tomato and spaghetti sauce.
This complete kit includes everything you need and lasts for years: the canner, jar rack, Jar grabber tongs, lid lifting wand, a plastic funnel, labels, bubble freer, It's much cheaper than buying the items separately. It's only missing the bible of canning, the Ball Blue Book.
You will never need anything else except jars & lids (and the jars are reusable)!
The complete list of canners is on these pages:
- Water bath canners - Good for acidic foods, like applesauce, pickles, salsa, jams, jellies, most fruits
- Pressure canners - needed for low and non-acidic foods, like canned vegetables (corn, green beans, etc), and meats
- Canners for glass top stoves if you have a glass or ceramic stove
- Canners for induction stovetops

Pressure Canners
If you plan on canning non-acidic foods and low acid foods that are not pickled - this means: meats, seafood, soups, green beans corn, most vegetables, etc., then you ABSOLUTELY must use a Pressure Canner.
Of course, you can use a pressure canner as a water bath canner as well - just don't seal it up, so it does not pressurize. This means a Pressure Canner is a 2-in-1 device. With it, you can can almost ANYTHING.
There are also other supplies, accessories, tools and more canners, of different styles, makes and prices, click here!
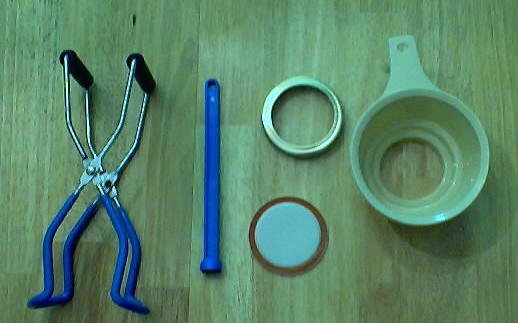
Basic Canning Accessories
From left to right:
- Jar lifting tongs to pick up hot jars
- Lid lifter - to remove lids from the pot of boiling water (sterilizing )
- Lids- disposable - you may only use them once
- Ring - holds the lids on the jar until after the jars cool - then you remove them, save them and reuse them
- Canning Jar funnel - to fill the jars
FREE Illustrated Canning, Freezing, Jam Instructions and Recipes
Don't spend money on books. that you don't need to. Almost everything you can find in some book sold online or in a store is on my website here for free. Start with theEasy Home Canning Directions below. That is a master list of canning directions which are all based upon the Ball Bblue book, the National Center for Home Food Preservation and other reputable lab tested recipes. Almost every recipe I present in addition to being lab tested com. is in a step by step format with photos for each step and complete. explanations. that tell you how to do it, where to get the supplies and pretty much everything you need to know. In addition, there almost always in a PDF format so you can print them out and use them while you cook.
[ Easy Home Canning Directions]
[FAQs - Answers to common questions and problems]
[Recommended books about home canning, jam making, drying and preserving!]


Looking for canning equipment and supplies?
Water bath canner with a jar rack
Pressure canners for gas, electric and induction stoves: Presto 23Qt or T-fal 22Qt
 Canning scoop (this one is PERFECT)
 Ball Blue book (most recent version)
Jars: 8oz canning jars for jams

Want to start your own Podcast, Blog, Vlog, etc? This
GoPro kit has EVERYTHING you need:
all accessories
Find Other types of farms:
Farm markets and roadside stands
Road trips and camping resources
Local Honey, apiaries, beekeepers
Consumer fraud and scams information
Home canning supplies at the best prices on the internet!
Maple Syrup Farms, sugarworks, maple syrup festivals
Environmental information and resources
Farms For Your Event for birthday parties, weddings, receptions, business meetings, retreats, etc.
Festivals - local fruit and vegetable festivals
Get the
most recent version of
the Ball Blue Book
Canning and preserving, making jams, salsa, sauces, pickles, etc is SO easy with our step by step directions! Just about all you need is a canner and canning jars!
