
Looking for How to Make Homemade Fruit (Cherries, Blueberries, Strawberries, Etc) Juice - Easily, Fully Illustrated Instructions and Recipe! in 2026? Scroll down this page and follow the links. And if you bring home some fruit or vegetables and want to can, freeze, make jam, salsa or pickles, see this page for simple, reliable, illustrated canning, freezing or preserving directions. There are plenty of other related resources, click on the resources dropdown above. If you are having a hard time finding canning lids, I've used these, and they're a great price & ship in 2 days.
If you have questions or feedback, please let me know! There are affiliate links on this page. Read our disclosure policy to learn more.
How to Make Homemade Fruit (Cherries, Blueberries, Strawberries, Etc) Juice - Easily, Fully Illustrated Instructions and Recipe!
Yield: 7 to 9 pint jars
Making and canning / bottling your own fruit juice, from many types of fruit, such as berries of any kind (blueberries, cranberries, strawberries, raspberries, blackberries) or larger fruit (cherries, peaches, etc.) is quite easy. Here's how to do it, in 12 easy steps and completely illustrated. You can use the juice fresh, can (preserve or bottle) it for later or use it in making fruit wine.Ingredients and Equipment
|
Optional stuff:
|
Grape Juice-making Directions
This example shows you how to make grape juice, or juice from muscadines, scuppernongs and even berries, like raspberries, blueberries, etc..
 Step 1 - Pick the
fruit! (or buy them already
picked)
Step 1 - Pick the
fruit! (or buy them already
picked)
It's fun to go pick your own and you can obviously get better quality ones! You can use many types of fruit, such as berries of any kind (blueberries, cranberries, strawberries, raspberries, blackberries) or larger fruit (cherries, peaches, etc.) or grapes, including muscadines and scuppernongs. And as I pointed out above, you can use other types of berries, or mix them! Whichever you choose, you want flavorful grapes. Plain seedless white/green grapes, for example, have little flavor and make a bland juice. Most people choose Concord grapes or red grapes. Seedless or with seeds doesn't matter, as the strainer will remove them (except for very small seeds like strawberry, but most people don't care about those)!
I prefer to grow my own; which is really easy - but that does take some space and time.
Above are grapes that I picked at a pick-your-own farm. If you want to pick your own, here is a list and links to the pick your own farms.
Step 2 - How much fruit?
An average of 25 pounds of fruit is typically needed per canner load of 7 quarts of fruit juice. Of course, this varies, if the fruit has large pits, stones or other waste. Or to make 9 pints of juice, you will need an average of 16 pounds of fruit. If you are buying in bulk, a "lug" weighs 26 pounds and yields 7 to 9 quarts of juice; which is an average of 3-1/2 pounds of fruit needed per quart of juice.
Step 3 - Wash the jars and lids
Now's a good time to get the jars ready, so you won't be rushed later. The dishwasher is fine for the jars; especially if it has a "sanitize" cycle, the water bath processing will sanitize them as well as the contents! If you don't have a dishwasher with a sanitize cycle, you can wash the containers in hot, soapy water and rinse, then sanitize the jars by boiling them 10 minutes, and keep the jars in hot water until they are used.
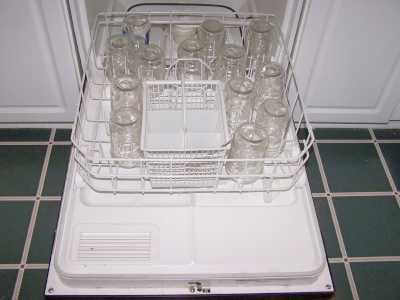 NOTE: If a canning recipe calls for 10 minutes or more of process time in the canner, then the jars do not need to be "sanitized" before filling them.
But really, sanitizing them first is just good hygeine and common sense! See this page for more detail about cleaning and sanitizing jars and lids.
NOTE: If a canning recipe calls for 10 minutes or more of process time in the canner, then the jars do not need to be "sanitized" before filling them.
But really, sanitizing them first is just good hygeine and common sense! See this page for more detail about cleaning and sanitizing jars and lids.
Put the lids into a pan of hot, but not quite boiling water (that's what the manufacturer's recommend) for 10 minutes, and use the magnetic "lid lifter wand" to pull them out.
Leave the jars in the dishwasher on "heated dry" until you are ready to use them. Keeping them hot will prevent the jars from breaking when you fill them with the hot juice.
Step 3 -Wash the fruit!
 I'm sure you can figure out how to wash the
fruit in a
large bowl under running plain
cold water.
I'm sure you can figure out how to wash the
fruit in a
large bowl under running plain
cold water.
Remove the fruit from the stems and pick out any stems and leaves that became mixed in!
 Step
4 - Crush or chop the fruit (optional)
Step
4 - Crush or chop the fruit (optional)
You can cook the fruit with out first chopping or crushing them, but I find
it speeds up the process.
 It's
up to you! A simple potato masher (far right) works fine, or a food
processor, below. You could also use a juicer
It's
up to you! A simple potato masher (far right) works fine, or a food
processor, below. You could also use a juicer
NOTE: If you have a electric juicer, you can simply juice the fruit, then skip to step 7 to heat the juice to boiling.
Optional - using a mechanical, steam or electric juicer or fruit press
A faster way to make larger volumes of juice, ideal for cottage food operations or if you are making jellies or wines is a juicer: either steam, electric mechanical or a fruit press.
See here for related tools, equipment, supplies on Amazon See here for related tools, equipment, supplies on Amazon See here for related tools, equipment, supplies on Amazon See here for related tools, equipment, supplies on Amazon See here for related tools, equipment, supplies on Amazon See here for related tools, equipment, supplies on Amazon See here for related tools, equipment, supplies on Amazon See here for related tools, equipment, supplies on Amazon
Step 5 - Heat the fruit on the stove
Put the berries or other fruit in a pot and add enough water to just cover the fruit. Put the crushed fruit in a big pot on the stove over medium to high heat (stir often enough to prevent burning) for until it starts to boil, then reduce the heat and simmer for 10 minutes. We just want to soften the skins to help release the juice and break down some of the fruit to help it pass through our juice strainer.
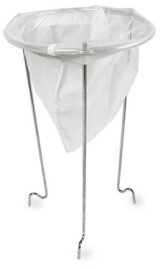
Step 6 - Sieve the cooked fruit
 You can either put the soft cooked
fruit through a
juice strainer
(about $9.00, see ordering at right) which results in the most clear
juice and is easiest to use, or pour them through cheesecloth in
a colander. Or if you don't mind chunky juice, just let the juice stand
for 20 minutes, and decant (pour off) the clear liquid to use and leave
the solids behind.
You can either put the soft cooked
fruit through a
juice strainer
(about $9.00, see ordering at right) which results in the most clear
juice and is easiest to use, or pour them through cheesecloth in
a colander. Or if you don't mind chunky juice, just let the juice stand
for 20 minutes, and decant (pour off) the clear liquid to use and leave
the solids behind.
You may also want to run the crushed cooked fruit through a Foley food mill (about $20 - see this page) BEFORE the juice strainer - unless you ran the fruit through a juicer, the food mill would help to extract more juice and separate the seeds, stems and skins that will clog the strainer. It's not necessary, but helps you get the most out of the fruit.
 See here for related tools, equipment, supplies on Amazon
|
If you need a stopping point and want to finish up the next day, this is a good place. Sometimes, juice gets crystals, called tartrate crystals, forming in the juice. They're not harmful and don't affect the taste, but some people don't like the appearance. I rarely even see them! But if you do, let juice stand in a in the fridge overnight, then strain through two thicknesses of damp cheesecloth to remove any crystals that have formed.
There is also a VERY nice, versatile strainer pictured at far right! Click on the links there or see the bottom of this page for more information and to order! The VillaWare model can handle higher volumes than a Foley food mill (without giving you cramps!)
See here for related tools, equipment, supplies on Amazon See here for related tools, equipment, supplies on Amazon To see a greater variety of strainers in other types, sizes, and prices, click here!
Step 7 - Polishing and further filtering
If you read the USDA's guide, they have additional steps to polish the juice so it is crystal clear. I don't bother with these as it adds a day or two to the process and most people like the natural look, anyway!
But if you do want the polished look, here what to do:
- Refrigerate juice from step 6 for 24 to 48 hours.
- Without mixing, shaking or disturbing it, carefully pour off clear liquid and save; discard the sediment.
- If desired, you may now strain through a paper coffee filter for a clearer juice.
- Continue to step 8.
Step 8 - Get the lids warming in hot (but not boiling) water
If you didn't do so already, put the lids into a pan of hot water for at least several minutes; to soften up the gummed surface and clean the lids.
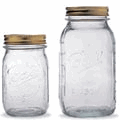

Need lids, rings and replacement jars?
Get them all here, delivered direct to your home, at the best prices on the internet!
Step 9 - Sweeten (if desired) and bring to a boil
 I
find that homemade grape juice, made using sweet fresh fruit, rarely needs
any additional sweetness. However if you have a sweet tooth or are
using very tart fruit, this is the time to add your sweetener (sugar,
Stevia (in a prepared form like Truvia, it measures same as sugar; if you use another form, you will need do your own conversion) - or Splenda, if you prefer, , honey, etc.).
I
find that homemade grape juice, made using sweet fresh fruit, rarely needs
any additional sweetness. However if you have a sweet tooth or are
using very tart fruit, this is the time to add your sweetener (sugar,
Stevia (in a prepared form like Truvia, it measures same as sugar; if you use another form, you will need do your own conversion) - or Splenda, if you prefer, , honey, etc.).
Bring the juice to a boil.
Step 10 - Fill the jars and put the lid and
rings on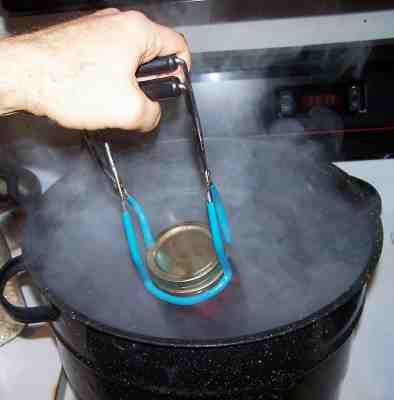
Fill them to within 1/4-inch of the top, wipe any spilled juice off the top, seat the lid and tighten the ring around them. Then put the filled jars into the canner!
This is where the jar tongs come in really handy!

Step 11 - Process the jars in the boiling water bath
 Keep
the jars covered with at least 2 inches of water. Keep the water boiling.
Keep
the jars covered with at least 2 inches of water. Keep the water boiling.
See the table below for the length of time to process the jars recommended for your altitude and size of jars used.
|
Recommended process time for Fruit Juice in a boiling-water canner. |
|||
| Process Time at Altitudes of | |||
| Jar Size | 0 - 1,000 ft | 1,001 - 6,000 ft | Above 6,000 ft |
| Pints or Quart jars |
5 min |
10 minutes | 15 minutes |
| Half-Gallon jars | 10min | 15 minutes | 20 minutes |
Step 12 - Remove and cool the jars - Done!
 Lift the jars out of the water with your jar lifter tongs and let them cool without touching or
bumping them in a draft-free place (usually takes overnight) You can then remove the rings if you like, but if you leave them on, at least loosen them quite a bit, so they don't rust in place due to trapped moisture. Once the jars are cool, you can check that they are sealed verifying that the lid has been sucked down. Just press in the center, gently, with your finger. If it pops up and down (often making a popping sound), it is not sealed. If you put the jar in the refrigerator right away, you can still use it. Some people replace the lid and reprocess the jar, then that's a bit iffy. If you heat the contents back up, re-jar them (with a new lid) and the full time in the canner, it's usually ok.
Lift the jars out of the water with your jar lifter tongs and let them cool without touching or
bumping them in a draft-free place (usually takes overnight) You can then remove the rings if you like, but if you leave them on, at least loosen them quite a bit, so they don't rust in place due to trapped moisture. Once the jars are cool, you can check that they are sealed verifying that the lid has been sucked down. Just press in the center, gently, with your finger. If it pops up and down (often making a popping sound), it is not sealed. If you put the jar in the refrigerator right away, you can still use it. Some people replace the lid and reprocess the jar, then that's a bit iffy. If you heat the contents back up, re-jar them (with a new lid) and the full time in the canner, it's usually ok.
Once cooled, they're ready to store. I find they last up to 12 months
if kept in a cool dark place, like a basement..
Summary - Typical Cost of Making Homemade Grape Juice - makes 12 jars, 8 oz each** |
||||
| Item | Quantity | Cost in 2026 | Source | Subtotal |
| Fruit | 4 lbs | $1.00/lb | Pick your own | $4.00 |
| Canning jars (quart size), includes lids and rings | 12 jars | $9.00/dozen | Grocery stores, like Public, Kroger, Safeway and sometimes, Big Lots, local hardware stores and big box stores | $7.00 |
| Sugar | 4 cups | $2.00 | Grocery stores, like Public, Kroger, Safeway and sometimes, Big Lots, local hardware stores and big box stores | $2.00 |
| Total | $15.70 total or about $1.30 per jar |
|||
|
** - This assumes you already have the pots, pans, ladles,, and reusable equipment. Note that you can reuse the jars and reduce the cost further; just buy new lids (the rings are reusable, but the flat lids are not)! |
||||
Can't find the equipment? We ship to all 50 states!
Use our Feedback form!
Answers to Common Questions
|
Illustrated Canning, Freezing, Jam Instructions and Recipes
[ Easy Home Canning Directions] [FAQs - Answers to common questions and problems] [Recommended books about home canning, jam making, drying and preserving!] [Free canning publications to download and print]
Canning Books, Supplies and Accessories
These are my favorite essential canning tools, books and supplies. I've been using many of these for over 50 years of canning! The ones below on this page are just the sampling of. my preferred tools. but you can find much more detailed and extensive selections on the pages that are linked below.
- Vacuum Foodsealers for freezing, dried foods, and refrigerated foods - the FoodSaver line
- Selecting a KitchenAid mixer and attachments for home canning
- Steam Juicers
- Strainers, pit removers, seed-skin-stem removers, jelly strainers, etc. All types, makes and prices (from $19 to $350)
- Cherry pitters reviews, prices and ordering
- Food dehydrators - easy and fast to dry your own fruits, veggies, sun-dried tomatoes, etc.
The All New Ball Book Of Canning And Preserving: Over 350 of the Best Canned, Jammed, Pickled, and Preserved Recipes Paperback
This is THE book on canning! My grandmother used this book when I was a child.; It tells you in simple instructions how to can almost anything; complete with recipes for jam, jellies, pickles, sauces, canning vegetables, meats, etc.
If it can be canned, this book likely tells you how! Click on the link below for more information and / or to buy (no obligation to buy)The New Ball Blue Book of Canning and Preserving
Canning and Preserving for Dummies by Karen Ward
This is another popular canning book. Click here for more information, reviews, prices for Canning and Preserving For Dummies
Of course, you do not need to buy ANY canning book as I have about 500 canning, freezing, dehydrating and more recipes all online for free, just see Easy Home Canning Directions.
Home Canning Kits
Ball Enamel Water Bath Canners:

I have several canners, and my favorite is the stainless steel one at right. It is easy to clean and seems like it will last forever. Mine is 10 years old and looks like new.
The black ones are the same type of standard canner that my grandmother used to make everything from applesauce to jams and jellies to tomato and spaghetti sauce.
This complete kit includes everything you need and lasts for years: the canner, jar rack, Jar grabber tongs, lid lifting wand, a plastic funnel, labels, bubble freer, It's much cheaper than buying the items separately. It's only missing the bible of canning, the Ball Blue Book.
You will never need anything else except jars & lids (and the jars are reusable)!
The complete list of canners is on these pages:
- Water bath canners - Good for acidic foods, like applesauce, pickles, salsa, jams, jellies, most fruits
- Pressure canners - needed for low and non-acidic foods, like canned vegetables (corn, green beans, etc), and meats
- Canners for glass top stoves if you have a glass or ceramic stove
- Canners for induction stovetops

Pressure Canners
If you plan on canning non-acidic foods and low acid foods that are not pickled - this means: meats, seafood, soups, green beans corn, most vegetables, etc., then you ABSOLUTELY must use a Pressure Canner.
Of course, you can use a pressure canner as a water bath canner as well - just don't seal it up, so it does not pressurize. This means a Pressure Canner is a 2-in-1 device. With it, you can can almost ANYTHING.
There are also other supplies, accessories, tools and more canners, of different styles, makes and prices, click here!
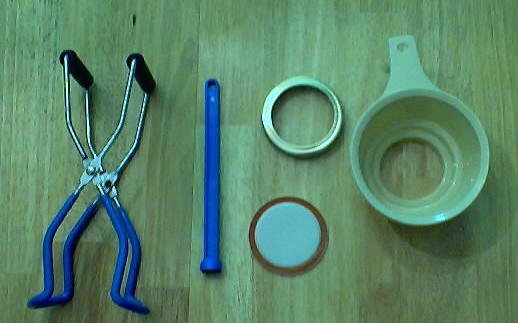
Basic Canning Accessories
From left to right:
- Jar lifting tongs to pick up hot jars
- Lid sanitizer / lifter - to remove lids from the pot of boiling water (sterilizing )
- Lids- disposable - you may only use them once
- Ring - holds the lids on the jar until after the jars cool - then you remove them, save them and reuse them
- Canning Jar funnel - to fill the jars
FREE Illustrated Canning, Freezing, Jam Instructions and Recipes
Don't spend money on books. that you don't need to. Almost everything you can find in some book sold online or in a store is on my website here for free. Start with theEasy Home Canning Directions below. That is a master list of canning directions which are all based upon the Ball Bblue book, the National Center for Home Food Preservation and other reputable lab tested recipes. Almost every recipe I present in addition to being lab tested com. is in a step by step format with photos for each step and complete. explanations. that tell you how to do it, where to get the supplies and pretty much everything you need to know. In addition, there almost always in a PDF format so you can print them out and use them while you cook.
[ Easy Home Canning Directions]
[FAQs - Answers to common questions and problems]
[Recommended books about home canning, jam making, drying and preserving!]


Looking for canning equipment and supplies?
Water bath canner with a jar rack
Pressure canners for gas, electric and induction stoves: Presto 23Qt or T-fal 22Qt
 Canning scoop (this one is PERFECT)
 Ball Blue book (most recent version)
Jars: 8oz canning jars for jams

Want to start your own Podcast, Blog, Vlog, etc? This
GoPro kit has EVERYTHING you need:
all accessories
Find Other types of farms:
Farm markets and roadside stands
Road trips and camping resources
Local Honey, apiaries, beekeepers
Consumer fraud and scams information
Home canning supplies at the best prices on the internet!
Maple Syrup Farms, sugarworks, maple syrup festivals
Environmental information and resources
Farms For Your Event for birthday parties, weddings, receptions, business meetings, retreats, etc.
Festivals - local fruit and vegetable festivals
Get the
most recent version of
the Ball Blue Book
Canning and preserving, making jams, salsa, sauces, pickles, etc is SO easy with our step by step directions! Just about all you need is a canner and canning jars!
